
Introduction to Mocha
Mocha is a feature-rich JavaScript testing framework that runs on Node.js and in the browser. It provides a powerful and flexible platform for writing and executing tests, making it a popular choice among developers for testing their JavaScript applications. Mocha’s simplicity and versatility make it suitable for both beginners and experienced developers alike.
Automated testing plays a crucial role in software development. It allows developers to catch bugs and errors early in the development process, ensuring that the code is functioning as expected. By writing tests, developers can verify the behavior of their code and ensure that it meets the desired requirements. Automated tests also provide a safety net when making changes to the codebase, allowing developers to refactor and add new features with confidence.
Mocha is designed to be highly customizable and adaptable to different testing scenarios. It provides a wide range of features and options that allow developers to write tests in a style that suits their needs. Mocha supports various test styles, such as BDD (Behavior-Driven Development) and TDD (Test-Driven Development), giving developers the flexibility to choose the approach that best fits their project.

Asynchronous Testing With Mocha
One of the key features of Mocha is its support for asynchronous testing. JavaScript is known for its asynchronous nature, and Mocha provides a clean and intuitive way to handle asynchronous code in tests. It offers built-in support for promises, callbacks, and async/await, making it easy to write tests for asynchronous operations such as API calls or database queries.
In addition to its core functionality, Mocha also integrates seamlessly with other popular testing libraries and tools. It has a rich ecosystem of plugins and extensions that enhance its capabilities and make it even more powerful. For example, developers can use libraries like Chai or Sinon.js to extend Mocha’s assertion capabilities or to mock and stub dependencies in their tests.
Dedicated Full Stack Developers
Hiring Full Stack developers gives businesses access to pros proficient in various technologies and frameworks. Their versatility streamlines collaboration, leading to faster development and enhanced efficiency.
Overall, Mocha is a versatile and powerful testing framework that provides developers with the tools they need to write reliable and maintainable tests for their JavaScript applications. Whether you are a beginner or an experienced developer, Mocha can help you improve the quality of your code and ensure that your software works as expected. In the following sections, we will dive deeper into the various features and functionalities of Mocha and explore how to use them effectively in your testing workflow.
Setting up Mocha
Before we can start using Mocha, there are a few prerequisites we need to take care of. We will guide you through the step-by-step process of installing Mocha, including the installation of Node.js and basic JavaScript knowledge. We will also explain how to use npm to install Mocha globally or as a project dependency. Additionally, we will walk you through creating a simple test file and explain the concepts of describe and it blocks.
To begin, let’s first ensure that you have Node.js installed on your machine. Node.js is a JavaScript runtime environment that allows you to run JavaScript code outside of a web browser. It provides a number of useful features and packages that we will utilize in our test setup.
If you don’t have Node.js installed, you can download and install it from the official Node.js website. Simply choose the appropriate installer for your operating system and follow the installation instructions provided. Once Node.js is installed, you can verify its installation by opening a terminal or command prompt and running the command node -v. This should display the version number of Node.js installed on your machine.
Next, we need to install Mocha. Mocha is a feature-rich JavaScript testing framework that allows you to write and run tests for your JavaScript applications. It provides a simple and intuitive interface for organizing and executing tests, making it a popular choice among developers.
To install Mocha, we will use npm, the package manager that comes bundled with Node.js. Open a terminal or command prompt and navigate to the root directory of your project. If you haven’t already initialized your project with npm, you can do so by running the command npm init. This will create a package.json file in your project directory, which will be used to manage your project’s dependencies.
Once your project is initialized, you can install Mocha by running the command npm install mocha. This will download and install the latest version of Mocha from the npm registry. By default, Mocha will be installed as a project dependency, meaning it will be listed in your package.json file and can be easily managed.
If you prefer to install Mocha globally, allowing you to use it across multiple projects, you can use the -g flag when running the installation command: npm install -g mocha. Keep in mind that installing Mocha globally may require administrative privileges, depending on your system configuration.
Once Mocha is installed, you can verify its installation by running the command mocha --version. This should display the version number of Mocha installed on your machine.
Would you like to get engaged with professional Specialists?
We are a software development team with extensive development experience in the Hybrid and Crossplatform Applications development space. Let’s discuss your needs and requirements to find your best fit.
Create A Simple Mocha Test File
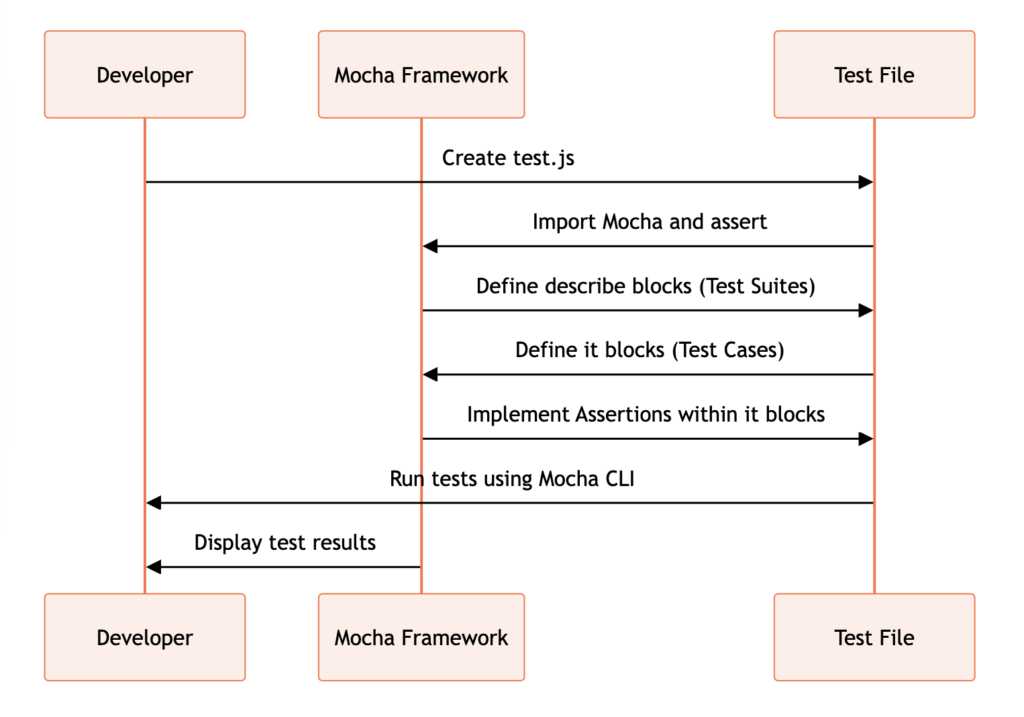
Now that Mocha is set up, let’s create a simple test file to get started. In your project directory, create a new file called test.js. This will serve as our test file for this example.
In the test.js file, we will start by importing the necessary dependencies. Since Mocha is built on top of Node.js, we can use the require function to import the Mocha module. Add the following line at the beginning of your test.js file:
const assert = require('assert');
const mocha = require('mocha');
Next, we will define a simple test using the describe and it blocks provided by Mocha. The describe block is used to group related tests together, while the it block is used to define individual test cases. Add the following code to your test.js file:
describe('Math', function() {
  describe('#add()', function() {
    it('should return the sum of two numbers', function() {
      assert.equal(2 + 2, 4);
    });
  });
});
Finally, we can run our tests using the Mocha command-line interface (CLI). Open a terminal or command prompt, navigate to your project directory, and run the command mocha. This will execute your test file and display the results in the terminal.
Congratulations! You have successfully set up Mocha and created your first test file. From here, you can continue exploring the various features and capabilities of Mocha to write comprehensive tests for your JavaScript applications.
Writing Your First Test with Mocha
Now that you have Mocha set up, it’s time to write your first test. We will guide you through crafting a basic test case and explain how assertions work in Mocha. We will also show you how to run tests using the Mocha CLI and how to watch files for changes, allowing you to re-run tests automatically. Understanding test output and interpreting results will also be covered in this section.
To start writing your first test, you need to create a new file in your project directory. Let’s call it `test.js`. In this file, we will write a simple test case to check if a function returns the correct value.
First, let’s create a test suite using the `describe` function provided by Mocha. A test suite is a way to group related test cases together. It helps in organizing your tests and makes it easier to understand the purpose of each test.
describe('MathUtils', function() {
  // Test cases will be written here
});
Inside the test suite, we can write individual test cases using the `it` function. Each test case should focus on testing a specific behavior or functionality of your code. Let’s write a test case to check if the `add` function of our `MathUtils` module correctly adds two numbers.
describe('MathUtils', function() {
  it('should return the sum of two numbers', function() {
    // Test case code will be written here
  });
});
Now, inside the test case, we can write the actual code to test our function. We will use the `assert` module provided by Node.js to make assertions. An assertion is a statement that checks if a certain condition is true or false. If the condition is true, the test passes; otherwise, it fails.
describe('MathUtils', function() {
  it('should return the sum of two numbers', function() {
    assert.equal(MathUtils.add(2, 3), 5);
  });
});
In the above example, we are using the `assert.equal` function to check if the result of `MathUtils.add(2, 3)` is equal to `5`. If the condition is true, the test passes; otherwise, it fails.
Now that we have written our first test case, let’s run it using the Mocha CLI. Open your terminal or command prompt and navigate to your project directory. Then, run the following command:
mocha test.js
Mocha will execute the test case and provide you with the test results. You will see an output similar to the following:
MathUtils
  ✓ should return the sum of two numbers
1 passing (10ms)
The output shows that our test case passed successfully. Mocha also provides information about the total number of passing and failing tests.
Now, let’s say you make changes to your code and want to re-run the tests automatically. Mocha provides a convenient way to do this using the `–watch` flag. Simply run the following command:
mocha test.js --watch
Mocha will watch for changes in the test file and automatically re-run the tests whenever you save the file. This can be a huge time-saver when developing and testing your code.
Understanding test output and interpreting results is an essential part of test-driven development.
When a test fails, Mocha provides detailed information about the failure, including the line number where the failure occurred and the expected and actual values. This helps in identifying the root cause of the failure and fixing the issue quickly.
In this section, we have covered the basics of writing tests with Mocha. We have explained how to create test suites and test cases, how to make assertions, and how to run tests using the Mocha CLI. We have also discussed how to watch files for changes and interpret test results. Armed with this knowledge, you are now ready to start writing comprehensive tests for your JavaScript code using Mocha and you are prepared to check on some advanced features next.
Elevate your software engineering skills without any subscription required!
Advanced Mocha Features
Mocha offers a range of advanced features that can enhance your testing workflow. In this section, we will explore using hooks for test setup and teardown, including before, after, beforeEach, and afterEach hooks. Hooks are functions that allow you to run code before or after each test or test suite. This can be useful for setting up a clean state before each test, or cleaning up any resources after each test has run.
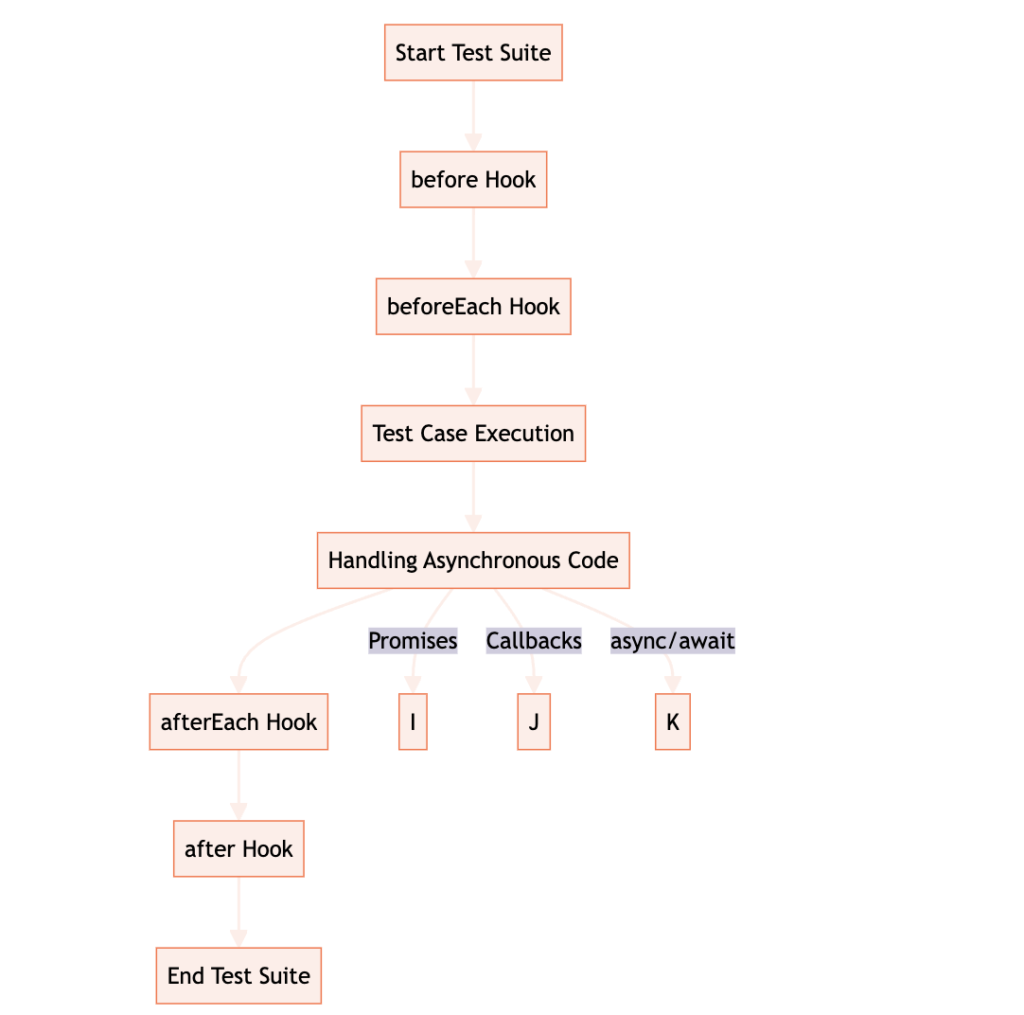
For example, you can use the beforeEach hook to initialize a database connection before each test, and the afterEach hook to close the connection after each test. This ensures that each test starts with a fresh database connection and leaves no resources open when the tests are finished.
In addition to hooks, Mocha also provides the ability to organize tests with nested describe blocks. This allows you to group related tests together, making it easier to understand and maintain your test suite. For example, you can have a top-level describe block for a specific feature, and within that, nested describe blocks for different scenarios or edge cases.
Testing asynchronous code is a common requirement in modern applications, and Mocha provides multiple ways to handle it. You can use callbacks, promises, or async/await syntax to write tests for asynchronous code. Mocha will automatically wait for asynchronous operations to complete before moving on to the next test. This ensures that your tests accurately reflect the behavior of your asynchronous code.
Finally, Mocha allows you to incorporate third-party assertion libraries such as Chai into your tests. Chai provides a wide range of assertion styles and chaining options, allowing you to write expressive and readable assertions. By combining Mocha’s test runner with Chai’s assertion library, you can create powerful and flexible tests that accurately verify the behavior of your code.
Mocha Best Practices
To ensure your Mocha tests are well-structured and maintainable, it’s important to follow best practices. In this section, we will provide guidance on structuring your test files and directories, including naming conventions for test files. We will also discuss isolating tests to ensure there are no dependencies between them and cover mocking and stubbing with Sinon for more complex test scenarios.
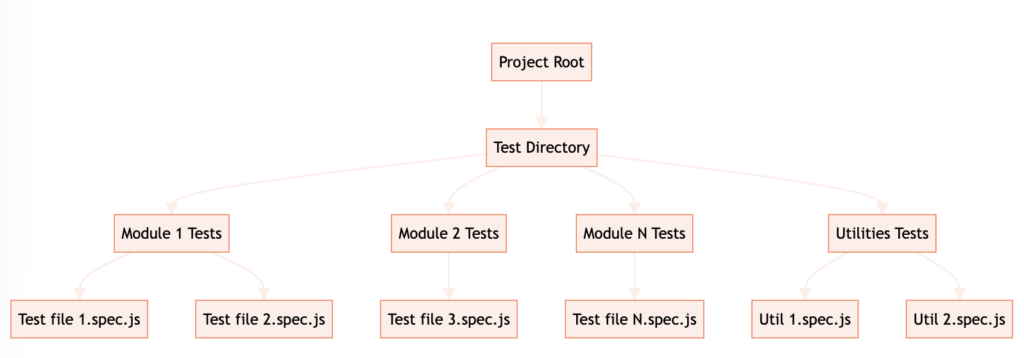
When organizing your test files and directories, it’s recommended to follow a consistent and logical structure. One common approach is to create a separate directory for your test files, parallel to your source code directory. This helps keep your tests separate from your actual codebase and makes it easier to manage and run them.
Within the test directory, you can further organize your test files into subdirectories based on the different modules or components you are testing. For example, if you have a project with multiple modules such as authentication, user management, and data processing, you can create separate subdirectories for each module.
When it comes to naming conventions for test files, it’s a good practice to use the same name as the file you are testing, but with a “.test.js” or “.spec.js” suffix. This helps in quickly identifying which files are test files and also makes it easier to run specific tests using wildcard patterns.
Isolating tests is crucial to ensure that they are independent of each other and do not rely on any shared state or dependencies. Mocha provides hooks such as “beforeEach” and “afterEach” that allow you to set up and tear down any necessary resources before and after each test case. This helps in maintaining a clean and isolated environment for each test.
When dealing with complex test scenarios that involve mocking or stubbing external dependencies, Sinon.js is a powerful tool that integrates well with Mocha. Sinon provides various features such as spies, stubs, and mocks that allow you to simulate and control the behavior of external dependencies. This enables you to test your code in isolation and verify its interactions with external components.
By following these best practices, you can ensure that your Mocha tests are well-organized, maintainable, and reliable. This will ultimately lead to a more robust and bug-free codebase, as you can catch and fix issues early on in the development process.
Integrating Mocha with Other Tools
Mocha can be seamlessly integrated with other tools to enhance your development workflow. In this section, we will explain how to use Mocha with continuous integration (CI) systems and configure it to work with code coverage tools such as Istanbul. We will also provide tips for debugging failing tests and resolving common issues that may arise during integration.
Continuous Integration with Mocha
Continuous Integration (CI) is a software development practice where developers regularly merge their code changes into a central repository, and automated builds and tests are run to detect any integration issues. Mocha can be easily integrated into CI systems such as Jenkins, Travis CI, or CircleCI to ensure that your tests are executed automatically whenever code changes are made.
To integrate Mocha with your CI system, you will need to configure the necessary build scripts or pipelines. Typically, you will need to install Mocha as a dev dependency and specify the command to run your Mocha tests. You can use the Mocha CLI or a test runner like npm test or yarn test to execute your tests. Make sure to set up your CI system to run these commands and report the test results.
Code Coverage with Istanbul
Code coverage is a metric that measures the percentage of code that is executed during your tests. It helps you identify areas of your codebase that are not adequately covered by tests and can guide you in writing additional tests to improve your overall test coverage. Istanbul is a popular code coverage tool that works seamlessly with Mocha.
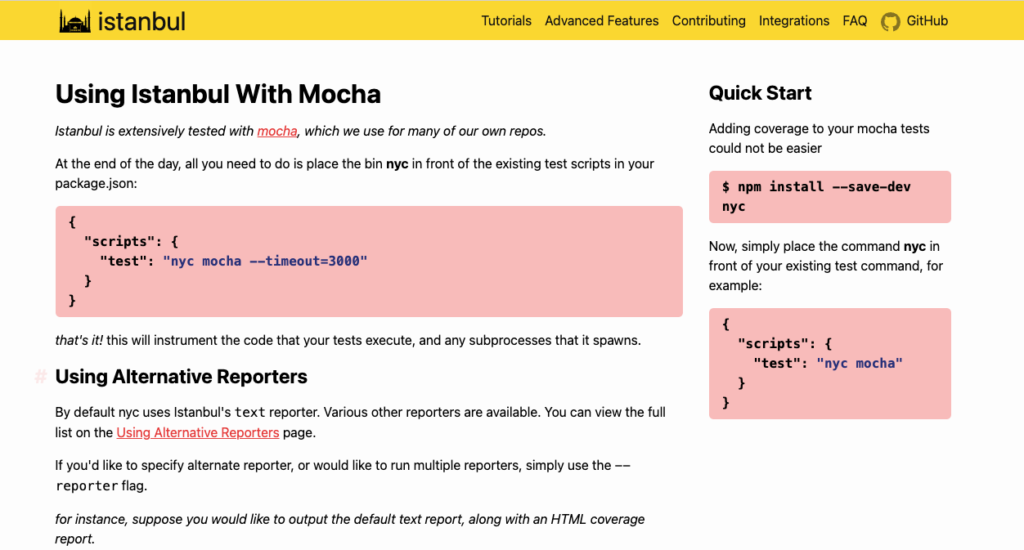
To enable code coverage with Mocha and Istanbul, you will need to install Istanbul as a dev dependency and configure it to instrument your code. Istanbul instruments your code by adding additional statements that track the execution of each line of code. When you run your Mocha tests, Istanbul collects data on which lines of code were executed and generates a coverage report.
Once you have generated a coverage report, you can use Istanbul’s built-in reporters or third-party tools like Istanbul Cobertura or Istanbul HTML to visualize the coverage data. These reports can help you identify areas of your code that need additional testing and improve the overall quality of your codebase.
Debugging Failing Tests
When your tests fail, it is important to quickly identify the cause of the failure and fix it. Mocha provides several tools and techniques to help you debug failing tests.
One useful technique is to use the Mocha “–inspect” flag, which starts your tests in debug mode. This allows you to attach a debugger, such as the Chrome DevTools or Node.js inspector, to your running tests and step through the code to identify the issue. You can set breakpoints, inspect variables, and track the flow of your code to understand why a test is failing.
In addition to using a debugger, Mocha provides various hooks and options that can help you isolate and debug specific tests or test suites. For example, you can use the “only” function to run only a specific test or test suite, or the “skip” function to skip certain tests during debugging.
Resolving Common Integration Issues
When integrating Mocha with other tools, you may encounter some common issues that can affect the execution and reliability of your tests. Here are a few tips to help you resolve these issues:
- Make sure you have the correct versions of Mocha and its dependencies installed. Incompatible versions can lead to unexpected behavior.
- Check your test environment and ensure that all required dependencies and configurations are properly set up.
- If you are using Mocha plugins or custom reporters, ensure that they are compatible with your Mocha version and properly configured.
- If you are experiencing slow test execution, consider optimizing your tests or using parallelization techniques to speed up the process.
- If you are running tests in a browser environment, make sure to handle any browser-specific issues or limitations that may arise.
- Regularly update your dependencies, including Mocha and its plugins, to take advantage of bug fixes and new features.
By following these tips and best practices, you can effectively integrate Mocha with other tools and maximize the efficiency and reliability of your testing process.
Now grab yourself a mocha if you made it so far.
Enjoy!