
JUnit 5 is the latest version of the popular Java testing framework, JUnit. It introduces several new features and improvements over its predecessor, JUnit 4. In this tutorial, we will explore the key concepts and functionalities of JUnit 5, making it easier for beginners to get started with this powerful testing tool.

Evolution from JUnit 4 to JUnit 5: What’s New?
JUnit 5 brings significant enhancements to the testing landscape, addressing the limitations of JUnit 4 and introducing new functionalities. Some of the notable improvements include:
Improved architecture:
JUnit 5 is built on a modular architecture, consisting of three main components: Jupiter, Platform, and Vintage. This modular structure allows for better flexibility and extensibility.
New programming model:
JUnit 5 introduces a new programming model based on annotations, providing developers with more expressive and flexible ways to write tests.
Enhanced assertions:
JUnit 5 provides a rich set of assertion methods, making it easier to validate test outcomes and write more readable test cases.
Dynamic tests:
JUnit 5 introduces the concept of dynamic tests, allowing developers to generate tests programmatically at runtime.
Parameterized tests:
JUnit 5 offers built-in support for parameterized tests, enabling developers to write tests that can be executed with different input values.
The Architecture of JUnit 5: Jupiter, Platform, and Vintage
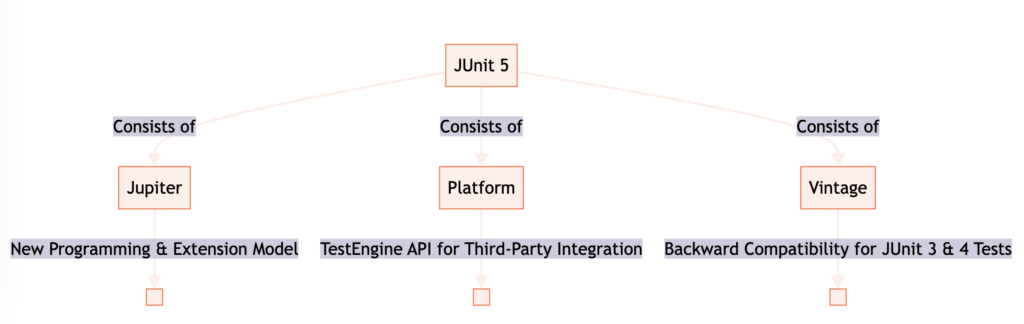
JUnit 5 is built on a modular architecture, consisting of three main components: Jupiter, Platform, and Vintage.
Jupiter: Jupiter is the new programming and extension model for JUnit 5. It provides annotations and APIs for writing tests and extensions. Jupiter also includes a new test engine that can execute tests written using the Jupiter model.
Platform: The Platform component provides the foundation for running tests on different platforms, such as IDEs and build tools. It includes the TestEngine API, which allows third-party test engines to be plugged into the JUnit platform.
Vintage: Vintage is a compatibility layer that allows JUnit 3 and JUnit 4 tests to be executed on the JUnit 5 platform. This ensures backward compatibility and allows developers to migrate their existing tests to JUnit 5 gradually.
Dedicated Full Stack Developers
Hiring Full Stack developers gives businesses access to pros proficient in various technologies and frameworks. Their versatility streamlines collaboration, leading to faster development and enhanced efficiency.
Why JUnit 5 is a Significant Upgrade for Java Developers
JUnit 5 brings several improvements and new features that make it a significant upgrade for Java developers. Here are some reasons why you should consider using JUnit 5 for your testing needs:
Improved test organization: JUnit 5 introduces the concept of nested test classes, allowing developers to organize their tests in a more structured and hierarchical manner. This makes it easier to manage and maintain test suites.
Enhanced parameterized testing: JUnit 5 provides built-in support for parameterized tests, eliminating the need for external libraries or custom implementations. This simplifies the process of writing tests with multiple input values.
Flexible test lifecycle: JUnit 5 offers a more flexible test lifecycle, allowing developers to define setup and teardown methods at different levels of granularity. This gives more control over the initialization and cleanup of test resources.
Improved IDE integration: JUnit 5 provides better integration with popular IDEs like Eclipse and IntelliJ IDEA. This includes features such as intelligent test discovery, enhanced test runner, and improved reporting.
Extensibility and customization: JUnit 5 offers a powerful extension model that allows developers to extend and customize the framework according to their specific needs. This enables the integration of other testing tools and frameworks seamlessly.
Setting up JUnit 5: Prerequisites and Environment Setup
Before we dive into writing tests with JUnit 5, let’s first ensure that we have the necessary prerequisites in place and set up the environment for JUnit 5.
To get started with JUnit 5, you will need the following:
Java Development Kit (JDK): Ensure that you have JDK 8 or later installed on your system.
Build tool: JUnit 5 can be integrated with popular build tools like Maven and Gradle. Choose the build tool of your preference and set up a new project.
IDE: JUnit 5 works seamlessly with popular IDEs like Eclipse and IntelliJ IDEA. Install the IDE of your choice and create a new project.
Once you have the prerequisites in place, you can proceed to integrate JUnit 5 with your IDE and configure the build tool to include the necessary dependencies.
Integrating JUnit 5 with Popular IDEs
JUnit 5 provides seamless integration with popular IDEs like Eclipse and IntelliJ IDEA. Here are the steps to integrate JUnit 5 with these IDEs:
Eclipse: To integrate JUnit 5 with Eclipse, you can use the “JUnit 5” plugin available in the Eclipse Marketplace. Install the plugin and follow the instructions to configure JUnit 5 for your project.
IntelliJ IDEA: IntelliJ IDEA has built-in support for JUnit 5. Create a new project in IntelliJ IDEA and select JUnit 5 as the testing framework. IntelliJ IDEA will automatically configure the necessary dependencies and settings for JUnit 5.
Once you have integrated JUnit 5 with your IDE, you can start writing tests using the new programming model and features provided by JUnit 5.
Would you like to get engaged with professional Specialists?
We are a software development team with extensive development experience in the Hybrid and Crossplatform Applications development space. Let’s discuss your needs and requirements to find your best fit.
Dependency Configuration with Maven and Gradle
JUnit 5 can be easily integrated with popular build tools like Maven and Gradle. Here’s how you can configure the dependencies for JUnit 5 in your build file:
Maven
In your project’s `pom.xml` file, add the following dependencies for JUnit 5:
org.junit.jupiter
junit-jupiter-api
5.8.0
test

org.junit.jupiter
junit-jupiter-engine
5.8.0
test
Gradle
In your project’s `build.gradle` file, add the following dependencies for JUnit 5:
dependencies {
testImplementation 'org.junit.jupiter:junit-jupiter-api:5.8.0'
testRuntimeOnly 'org.junit.jupiter:junit-jupiter-engine:5.8.0'
}
Once you have configured the dependencies, you can use JUnit 5 annotations and APIs in your tests.
Basic Concepts in JUnit 5: Annotations and Their New Features
JUnit 5 introduces a new programming model based on annotations, providing developers with more expressive and flexible ways to write tests. Let’s explore some of the basic annotations in JUnit 5 and their new features:
@Test: The `@Test` annotation is used to mark a method as a test method. In JUnit 5, the `@Test` annotation provides additional features such as `displayName` to specify a custom name for the test, `timeout` to set a timeout for the test, and `expected` to specify the expected exception.
@BeforeEach and @AfterEach: The `@BeforeEach` and `@AfterEach` annotations are used to mark methods that should be executed before and after each test method, respectively. In JUnit 5, these annotations can be used at different levels, allowing more flexibility in setting up and tearing down test resources.
@DisplayName: The `@DisplayName` annotation is used to provide a custom display name for a test class or method. This can be helpful in making the test results more readable and meaningful.
@Nested: The `@Nested` annotation is used to define nested test classes. This allows developers to group related tests together and organize them in a hierarchical structure.
These are just a few examples of the annotations and their new features in JUnit 5. The framework provides many more annotations and APIs that can be used to write expressive and powerful tests.
Elevate your software engineering skills without any subscription required!
Understanding the Lifecycle of a JUnit 5 Test Case
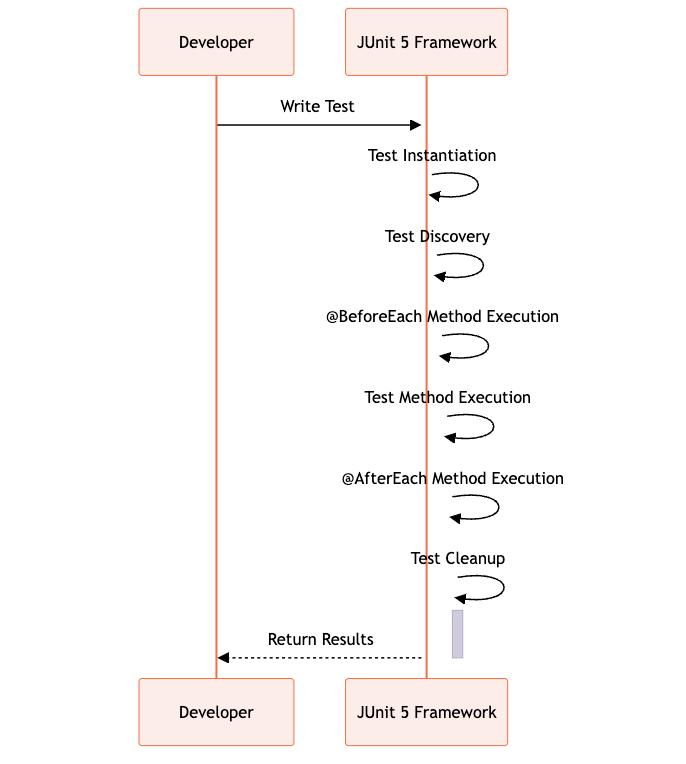
In JUnit 5, the lifecycle of a test case is divided into several phases, each represented by a specific annotation. Let’s understand the different phases of the test lifecycle in JUnit 5:
Test instantiation: The test class is instantiated before any test method is executed. This allows for the initialization of any shared resources or setup required for the tests.
Test discovery: JUnit 5 discovers all the test methods in the test class. This includes methods annotated with `@Test`, as well as methods annotated with other test-related annotations.
Test execution: Each test method is executed individually. The `@BeforeEach` methods are executed before each test method, and the `@AfterEach` methods are executed after each test method.
Test cleanup: After all the test methods have been executed, any cleanup or teardown operations can be performed. This can be done using methods annotated with `@AfterAll`.
Understanding the lifecycle of a test case is crucial for writing effective and maintainable tests in JUnit 5. It allows developers to control the setup and teardown of test resources and ensures that tests are executed in a consistent and predictable manner.
Writing Tests in JUnit 5: Structuring Test Cases and Test Methods Effectively
In JUnit 5, tests are organized into test classes, and each test class can contain multiple test methods. It is important to structure test cases and test methods effectively to improve the readability and maintainability of the tests. Here are some best practices for structuring tests in JUnit 5:
Group related tests: Group related tests together in a single test class. This makes it easier to understand the purpose and scope of the tests.
Use descriptive names: Use descriptive names for test classes and test methods. This helps in understanding the intent of the tests and makes the test results more meaningful.
Follow the arrange-act-assert pattern: Structure each test method according to the arrange-act-assert pattern. This makes the test logic more explicit and easier to understand.
Avoid test dependencies: Ensure that each test method is independent and does not rely on the state or behavior of other test methods. This improves test reliability and reduces the chances of false positives or false negatives.
Use nested test classes: Use nested test classes to group related tests and create a hierarchical structure. This improves the organization and readability of the tests.
By following these best practices, you can write tests that are easier to understand, maintain, and execute.
Employing Assertions to Validate Test Outcomes
Assertions play a crucial role in validating the outcomes of tests. In JUnit 5, there are several assertion methods available that make it easier to write expressive and readable assertions. Here are some commonly used assertion methods in JUnit 5:
assertEquals:
The `assertEquals` method is used to check if two values are equal. It compares the expected value with the actual value and throws an assertion error if they are not equal.
assertTrue and assertFalse:
The `assertTrue` and `assertFalse` methods are used to check if a given condition is true or false, respectively. They throw an assertion error if the condition is not met.
assertNull and assertNotNull:
The `assertNull` and `assertNotNull` methods are used to check if a given value is null or not null, respectively. They throw an assertion error if the condition is not met.
assertThrows:
The `assertThrows` method is used to check if a specific exception is thrown by a given code block. It allows for precise exception handling in tests.
These are just a few examples of the assertion methods available in JUnit 5. The framework provides many more assertion methods that can be used to validate different types of test outcomes.
Dynamic Tests with @TestFactory for Generating Tests Programmatically
JUnit 5 introduces the concept of dynamic tests, which allows developers to generate tests programmatically at runtime. This can be useful in scenarios where the number or structure of tests is not known at compile time. The `@TestFactory` annotation is used to define dynamic tests in JUnit 5. Here’s an example:
@TestFactory
Stream dynamicTests() {
return Stream.of("apple", "banana", "orange")
.map(fruit -> dynamicTest("Test " + fruit, () -> {
assertTrue(fruit.length() > 0);
}));
}
In this example, the `dynamicTests` method generates dynamic tests for three different fruits: apple, banana, and orange. Each dynamic test checks if the length of the fruit name is greater than 0. The `dynamicTest` method is used to create individual dynamic tests.
Dynamic tests provide a powerful way to generate tests based on dynamic data or conditions. They can be used to write more flexible and expressive tests.
Advanced Features of JUnit 5: Parameterized Tests and Custom Sources
JUnit 5 provides advanced features for writing tests, including parameterized tests and custom sources. Let’s explore these features in more detail:
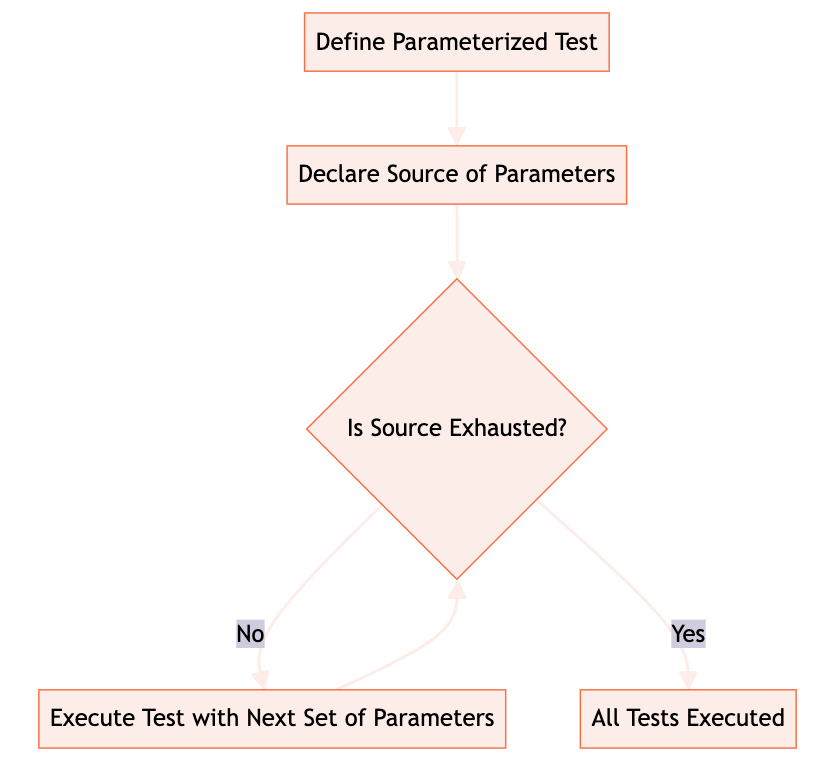
Parameterized tests:
JUnit 5 offers built-in support for parameterized tests, allowing developers to write tests that can be executed with different input values. This eliminates the need for writing multiple test methods for different input scenarios. Parameterized tests can be defined using the `@ParameterizedTest` annotation and can receive input values from various sources such as arrays, CSV files, or custom sources.
Custom sources:
JUnit 5 allows developers to define custom sources for providing input values to parameterized tests. This can be useful when the input values need to be generated dynamically or fetched from an external source. Custom sources can be implemented by implementing the `ArgumentsProvider` interface and annotating the parameterized test with `@ArgumentsSource`.
These advanced features of JUnit 5 provide more flexibility and power to write tests that cover a wider range of scenarios and input values.
Using Tags for Filtering Test Execution
JUnit 5 allows tests to be tagged with custom tags, enabling developers to filter the execution of tests based on specific criteria. Tags can be assigned to test classes or test methods using the `@Tag` annotation. Here’s an example:
@Tag("slow")
@Test
void expensiveOperationTest() {
// Test logic
}
In this example, the `expensiveOperationTest` is tagged as “slow”. During test execution, you can use the `–include-tag` and `–exclude-tag` options to filter the tests based on the assigned tags. For example, to run only the tests with the “slow” tag, you can use the following command:
mvn test -Dgroups=slowUsing tags for filtering test execution allows developers to run specific subsets of tests based on their requirements, saving time and resources.
Test Interfaces for Sharing Test Logic Across Test Classes
JUnit 5 allows the sharing of test logic across multiple test classes using test interfaces. Test interfaces can define common test methods, default implementations, and lifecycle methods that can be reused by multiple test classes. Here’s an example:
public interface DatabaseTest {
@BeforeEach
default void setupDatabase() {
// Database setup logic
}

@AfterEach
default void cleanupDatabase() {
// Database cleanup logic
}
}

public class UserRepositoryTest implements DatabaseTest {
@Test
void testUserCreation() {
// Test logic
}
}

public class OrderRepositoryTest implements DatabaseTest {
@Test
void testOrderCreation() {
// Test logic
}
}
In this example, the `DatabaseTest` interface defines the `setupDatabase` and `cleanupDatabase` methods, which are annotated with `@BeforeEach` and `@AfterEach`, respectively. The `UserRepositoryTest` and `OrderRepositoryTest` classes implement the `DatabaseTest` interface and inherit the common test logic.
Using test interfaces, you can avoid code duplication and ensure consistent test setup and teardown across multiple test classes.
JUnit 5 Extensions and Customizations
JUnit 5 provides a powerful extension model that allows developers to extend and customize the framework according to their specific needs. Extensions can be used to add new functionalities, modify the behavior of the framework, or integrate with other testing tools and frameworks.
Here’s an overview of the extension model in JUnit 5:
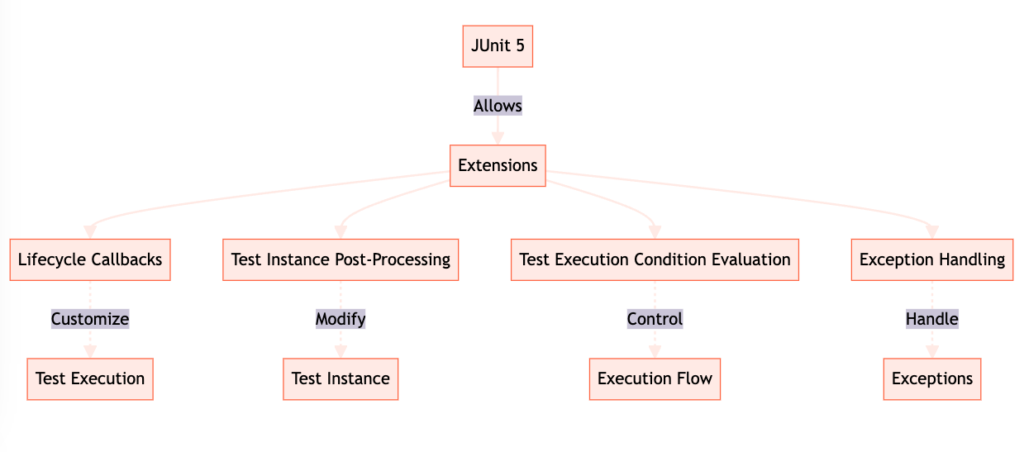
Extension points:
JUnit 5 defines several extension points, such as lifecycle callbacks, test instance post-processing, and test execution condition evaluation. Extensions can be registered at these extension points to modify the behavior of the framework.
Built-in extensions:
JUnit 5 provides several built-in extensions that offer additional functionalities. Some examples include `@Disabled`, `@Timeout`, and `@RepeatedTest`. These extensions can be used by annotating test classes or methods.
Custom extensions:
Developers can create their own custom extensions by implementing the extension interfaces provided by JUnit 5. Custom extensions can be used to add new functionalities or integrate with other tools and frameworks.
JUnit 5 extensions provide a powerful mechanism for extending and customizing the framework, making it more flexible and adaptable to different testing scenarios.
Integration with Other Testing Tools and Frameworks
JUnit 5 can be easily integrated with other testing tools and frameworks, allowing developers to leverage the existing ecosystem and tools. Here are some examples of integration with popular tools and frameworks:
Mockito:
JUnit 5 works seamlessly with Mockito, a popular mocking framework for Java. You can use Mockito to create mock objects and stub dependencies in your test cases.
Spring Framework: JUnit 5 integrates well with the Spring Framework, a widely used framework for Java applications. You can use JUnit 5 to write tests for Spring components and leverage the testing annotations provided by Spring.
Code coverage tools:
JUnit 5 can be integrated with code coverage tools like JaCoCo and Cobertura. These tools provide insights into the code coverage of your tests, helping you assess the quality and effectiveness of your test suite.
By integrating JUnit 5 with other testing tools and frameworks, you can enhance your testing capabilities and leverage the features provided by these tools.
Best Practices in Testing with JUnit 5
JUnit 5 provides several features and functionalities that can help Java developers write effective and maintainable tests. Here are some best practices to keep in mind when using JUnit 5:
Write readable and maintainable tests: Focus on writing tests that are easy to understand and maintain. Use descriptive names, follow a clear structure, and avoid unnecessary complexity.
Strategies for testing exceptions and timeouts: Use the appropriate assertion methods and annotations to test exceptions and timeouts. Ensure that your tests cover both expected and unexpected exceptions, and set appropriate timeouts for long-running tests.
Optimize test execution and coverage: Aim for fast and efficient test execution by avoiding unnecessary setup and teardown operations. Use code coverage tools to identify areas of your code that are not adequately covered by tests.
Keep tests independent and isolated: Ensure that each test is independent and does not rely on the state or behavior of other tests. This improves test reliability and reduces the chances of false positives or false negatives.
Use test data factories: Use test data factories or builders to create test data. This helps in keeping the test data generation logic separate from the test logic and makes tests more maintainable.
By following these best practices, you can ensure that your tests are effective, reliable, and provide meaningful feedback about the quality of your code.
Conclusion and Resources
JUnit 5 is a significant upgrade over JUnit 4, providing Java developers with a powerful and flexible testing framework. In this tutorial, we explored the key concepts and functionalities of JUnit 5, including its architecture, new features, and best practices for writing tests.
JUnit 5 offers a rich set of features that make it easier to write expressive, readable, and maintainable tests. By leveraging the new programming model, advanced features like parameterized tests and dynamic tests, and the extension model, developers can create robust test suites that provide valuable feedback about the quality of their code.
To deepen your understanding of JUnit 5, here are some further reading and resources:
JUnit 5 User Guide: The official JUnit 5 user guide provides comprehensive documentation and examples of using JUnit 5. It covers all the features and functionalities of the framework in detail.
JUnit 5 GitHub Repository: The JUnit 5 GitHub repository is a valuable resource for exploring the source code, documentation, and issue tracking of JUnit 5. It also provides information about the latest releases and updates.
JUnit 5 Extensions: The JUnit 5 extension registry is a curated list of extensions contributed by the community. It includes extensions for various functionalities like mocking, code coverage, and test reporting.
JUnit 5 Tutorials and Blogs: Several tutorials and blogs are available online that provide in-depth explanations and examples of using JUnit 5.
These resources can help you explore specific features or use cases in more detail.
Keeping yourself updated with the latest developments in JUnit 5 is essential to make the most of this powerful testing framework. Follow the official JUnit 5 website, community forums, and social media channels to stay up to date with the latest news, releases, and best practices.
Happy testing with JUnit 5!